糸長計算機 - Thread calculator
これは何? What’s this?
この「糸長計算機」はタティングレースを編む際に、パターンのステッチ数をもとにそのパターンがどれくらいの長さの糸を使用するかを概算するものです。
This “tatting thread calclator” will give you a rough estimate of how long a thread you will use based on the number of double stitches in the pattern.
ダウンロード Donloads
このファイルはGoogleスプレッドシートを使用していますが、Excel形式やODF形式に変換したものをダウンロードして使用することもできます。
It uses Google Spreadsheet, but you can also download the converted version in Excel or ODF format.
サンプルパターンについて About the sample pattern
今回説明のために描いた小さなモチーフも無料配布します。PDF形式です。
使用にあたっては下記を守って下さい。
The small motifs I drew for this tutorial are also available for free in PDF format. Please follow the instructions below when using them.
しても良いこと You can do it
- ご自身が作った完成写真のSNSへの投稿
post finished doilies / motifs on SNS/blog - 完成作品の譲渡
giveaway finished doily to someone
してはいけないこと Prohibited Matters
- チュートリアルなど動画への利用
Use for tutorials and other videos - 完成作品の販売
sell finished doilies / motifs - 有償無償を問わず、パターンの再配布
Resell / redistribute the tatting pattern itself - パターンファイルのURLへのダイレクトリンク(このページにリンクして下さい)
Direct link to the URL of the pattern file (please link to this page)
再配布について About Redistribution
これはただのスプレッドシートです。自由にお使い下さい。
タティングレースのオリジナルデザイン配布の際には、どうぞご自身のパターンの数値を入力したものを一緒に添付して下さい。大歓迎です。
使用方法はご自身で説明を添付されても良いですし、このページにリンクしても構いません。
報告は必要ありませんが、一言「使ったよ」と教えて下さるとよろこびます。
This is just a spreadsheet. Free to use.When distributing your original design of tatting lace, you may enter the values in this and attach it together.
You may attach your own instructions for use, or link to this page.
You don’t have to report it, but I’ d be happy if you could tell me that you used it.
使う前の準備 Preparation before using
使用する前に、あなたが使用する糸でダブルステッチ1目あたりの長さを算出しておく必要があります。
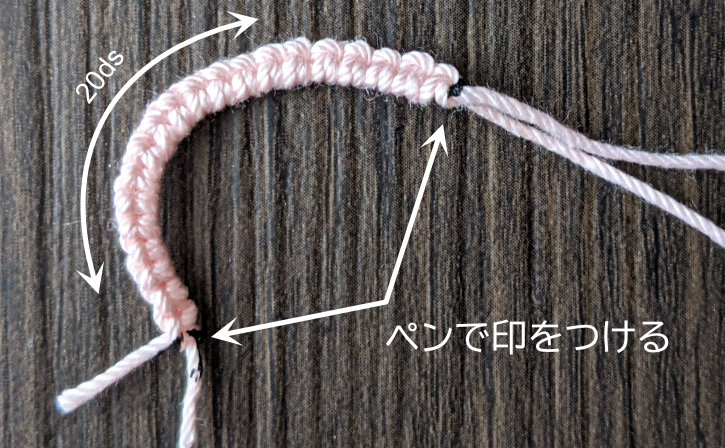
糸玉とシャトルでまずは20目のチェインを作って下さい。
できるだけ普段どおりの手加減で行います。
First of all, you need to calculate the length per double stitch with the thread you will be using.
Make a chain of 20ds with the ball and the shuttle. Do this with as much normal tension as possible.
始点と終点をマークする Mark the start and end.
チェインが編めたら、芯糸と巻糸両方に、チェインの最初と最後をマークします。
Mark the start and end of the chain for both the shuttle thread and the ball thread.
使用した糸の長さを測る Measure the length of the thread.

チェインの芯糸を抜きます。巻糸と芯糸の両方のマークの間の長さを測りましょう。
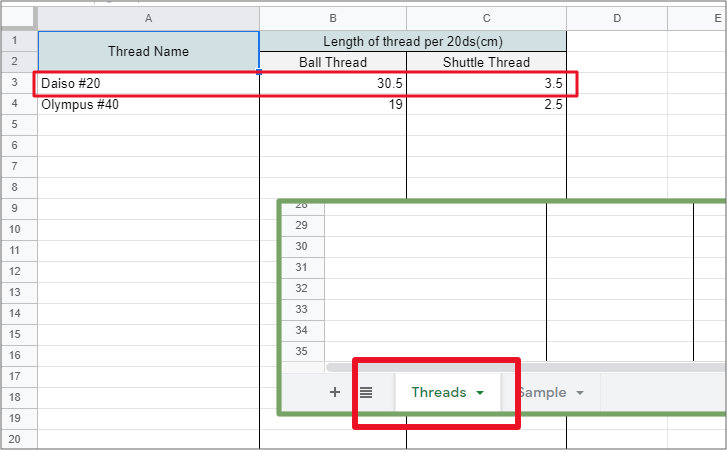
この数値は、使用する糸が同じならば手加減が変化しない限り何度も使うことができます。どこかにメモを残しておきましょう。
メモ用のthreadsというシートを用意していますのでそこを使っても良いでしょう。
Pull out the chain’s core thread.Measure the length between the ball thread and shuttle thread marks.
This number can be used many times as long as the thread used is the same. Make a note of this somewhere.
There is a sheet called “threads” available for notes.
使い方 How to use
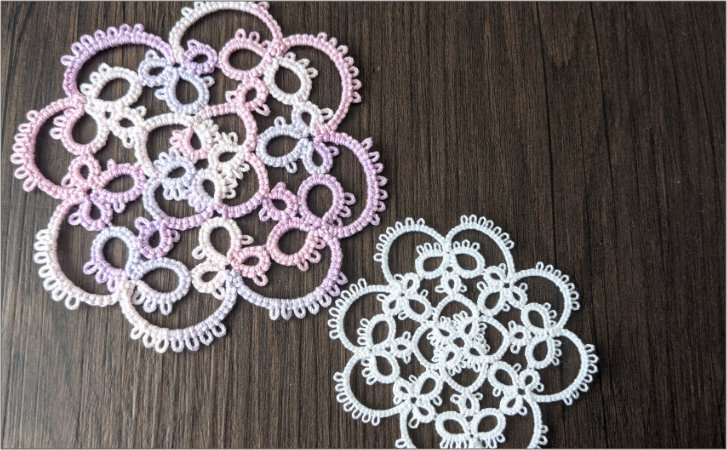
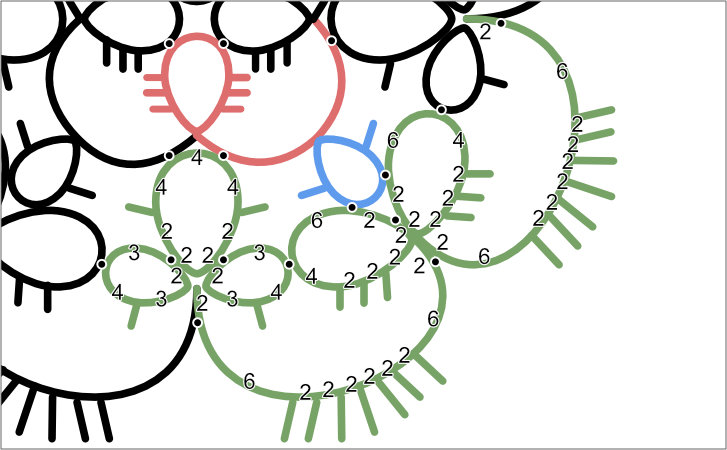
今回はサンプルとしてこのようなパターンを使用します。
this pattern will be used as a sample.
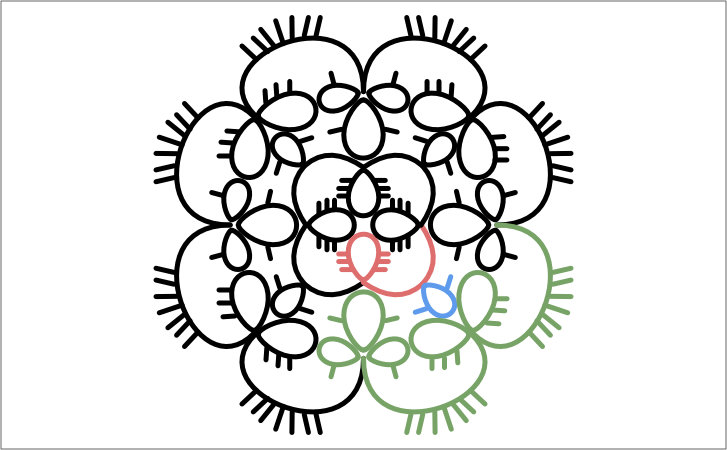
このパターンはシャトル1(赤)とシャトル2(青)で編む1段目と、シャトルひとつ(緑)で編む2段目で構成されています。
色のついた部分を4回繰り返しています。この部分を糸長計算機に入力します。
This pattern contains a row1 using shuttle 1 (red) and shuttle 2 (blue), and a row2 using shuttle (green) and ball.
The colored part is repeated four times. Enter this part into the thread calculator.
糸長計算機の行をコピーする Copy the line
このファイルの初期状態では、7行目のセルKとLに数式が入力されています。 今回作るモチーフは2段構成なので、7行目を先にコピーしておきましょう。7行目を選択してコピーして8行目にペーストします。
In the initial state of this file, the formulas are entered in cells K and L in row 7.
Since this pattern consists of two rows, let’s copy the seventh row first: select and copy the seventh row and paste it into the 8 row.

KとLのセルをドラッグしてコピーでも良いです。お好きな方をどうぞ。
You can also drag the K and L cells and copy them. Use whichever you prefer.
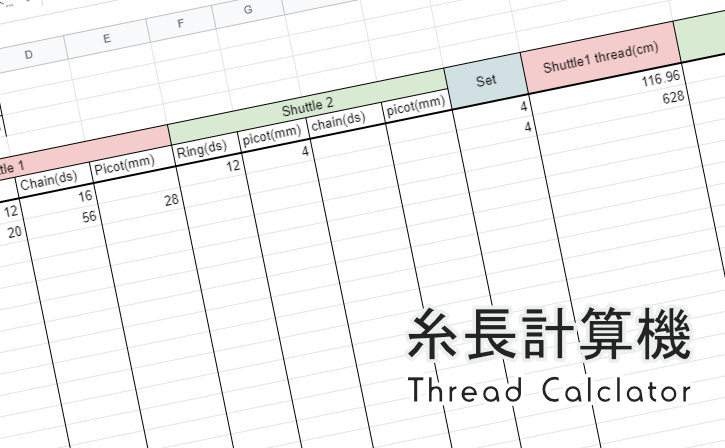
1段目の数値を入力する Enter the numbers of row1
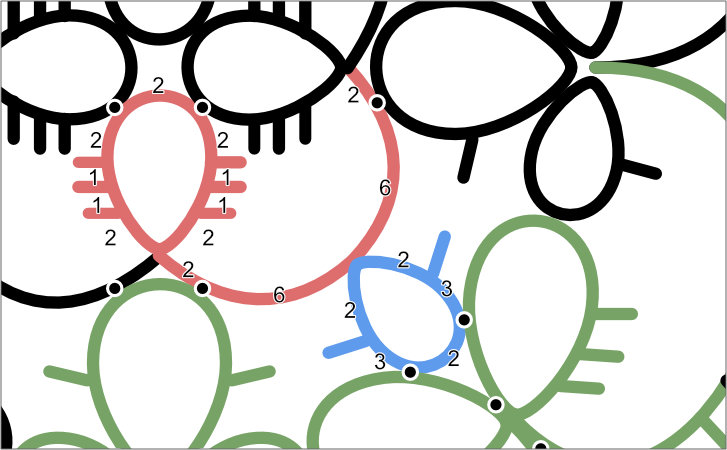 1段目では赤で示されたリングとチェイン、青のフローティングリングを4回繰り返します。
「シャトル1」欄は「シャトル1を使って作る目数」を意味します。
シャトル1とシャトル2、それぞれにダブルステッチの合計値を入力します。シャトル1はリングとチェイン、シャトル2はフローティングリングです。
1段目では赤で示されたリングとチェイン、青のフローティングリングを4回繰り返します。
「シャトル1」欄は「シャトル1を使って作る目数」を意味します。
シャトル1とシャトル2、それぞれにダブルステッチの合計値を入力します。シャトル1はリングとチェイン、シャトル2はフローティングリングです。
The “Shuttle 1” cells mean “ds made with Shuttle 1 in hand”.
In row 1, the red colored ring and chain and the blue floating ring are repeated four times.
Enter the total value of ds for shuttle 1 and shuttle 2, respectively. Here we are using shuttle 1 for the ring and chain, and shuttle 2 for the floating ring.
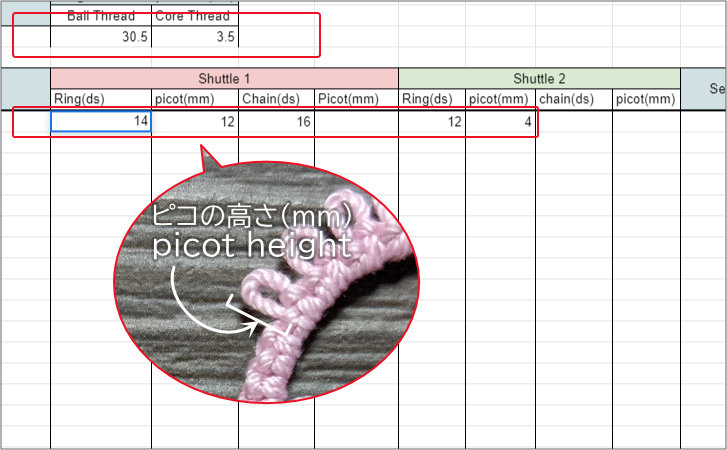
装飾ピコに使う長さを入力します。小さな接続用のピコはほとんど長さに影響がないので入力する必要はありません。
今回は装飾ピコは全て高さを2mmとします。ピコは長さではなく、高さであることに注意しましょう。単位はmmです。
シャトル1のリングではピコの欄に2mmのピコが6つなので「12」「=2+2+2+2+2+2」「=2*6」と入力します。この段はチェインにはピコはありません。
シャトル2のリングのピコにも「4」または「=2+2」「=2*2」などと入力します。
Enter the length to be used for the decorative picots.You don’t need to input a small picot for joining.
This time, all decorative picots are set to a height of 2 mm.The number you enter in the picot cell is the height, not the length.Lengths are in mm.
In the Shuttle 1 ring, there are six 2 mm picots, so enter “12” or “=2+2+2+2+2” or “=2*6” in the “picot” cell. There are no picots in the chain for this row.
In the “picot” cell of the shuttle 2 ring, enter “4” or “=2+2” or “=2*2”.
最後に、入力したパターンを何回繰り返すかを「set」に入力します。今回は「4」です。
A3-C3のセルに、最初に測った「20dsあたりの長さ」を入力します。
KとLのセルに入力値を基にして計算した糸の長さが表示されています。
Enter the number of times the pattern you entered is repeated in “set”. This time it is “4”.
In cells A3-C3, enter the “length per 20ds” that you measured first.
The length of the thread calculated based on the input values is displayed in the K and L cells.
これで1段目は完成です。必ず作業に必要な長さを足してシャトルに巻きましょう。
Now row1 is complete.When you wind the thread onto the shuttle, don’t forget to add the length you need to work with.
2段目の数値を入力する Enter the numbers of row2
この段はシャトルと糸玉で作成することができます。入力するのはシャトル1の欄だけです。
This row can be created with shuttle and ball
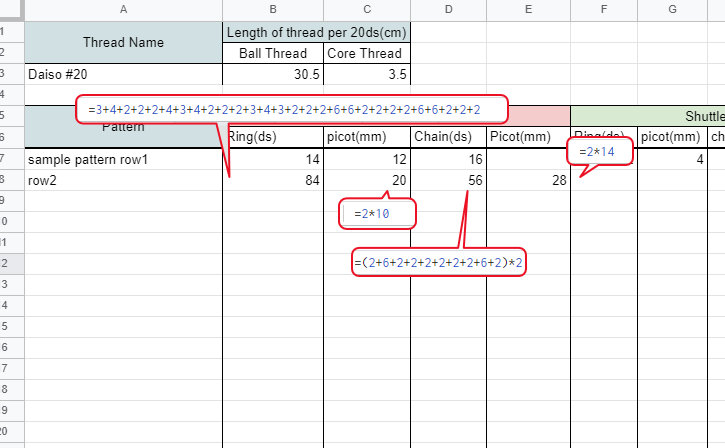
この段は色々な入力方法を使用してみました。「リングのdsを全て足す」「2mmのピコx10個」「(2p6P2P2P2P2P2P2P2P6p2)のチェイン x 2」。ただのスプレッドシートです。お好きな入力方法を使って下さい。
I used a variety of input methods.“Add all of the ring’s ds”,“10 picots of 2 mm”,“Chain of (2p6p2p2p2p2p2p2p6p2) x 2”.
It’s just a spreadsheet.You can use any input method you like.
2段目は糸玉とシャトルで作ることができるので、「シャトル2」の欄の数値は気にしなくて良いですが、この長さをシャトルやカードに巻き取って持ち出すこともできます。
シャトルに糸を巻く時は必ず作業用の長さを足すことを忘れないでくださいね。
Since row2 can be made with a ball and a shuttle, the value in the “Shuttle 2” cell is not necessary, but this length of thread can be winded onto a shuttle or card and brought out.don’t forget to add the length you need to work with.
コメント
コメントする